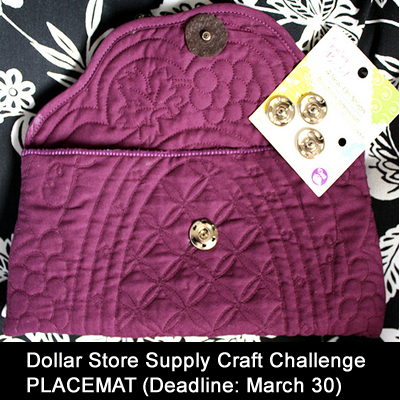
} -->

Tuesday, July 14, 2009

Free Online Class - Applique 3D Flowers, Week 3

Week 3 is here!
Don't forget about the Flikr group and the giveaway! Anyone who posts a class pic to the Flikr group will get an entry into the giveaway. So, if someone posts 1 pic a week for 3 weeks that's 3 entries. If they post 4 pics a week for 3 weeks that's still 3 entries. And so on...

The giveaway prizes are (drum roll please...)

A Christi Friesen Book

and A Lila Tueller Charm Pack!
Now on to Week 3!

Applique 3D Flowers

Calendar:
Week 1 - Get Ready, Get Set, Go
Week 2 - Supplies and Design
Week 3 - Making a Pattern
Week 4 - Stems
Week 5 - Flowers
Week 6 - Centers and Leaves

This week: Making a Pattern

We already decided approximately how large our design should be. Now we need to find a round object to use for the pattern. We will be cutting the stems and leaves freehand - they are way easy once the interfacing is attached to the fabric - and the flowers can be cut freehand too. However, I am not that talented with a pair of scissors so I prefer my flowers to be a little more...shall we say...normal looking.

The round object should be about 1/2 the width of the flower. Side by side, two of the same round object should be about the whole width of the flower. Lay the round object on your design, two of them if you have two, and see how they look. I decided I wanted my flowers to be a bit smaller than I had originally laid them out, so I made the change now.

As I mentioned before, I'm not very talented, so I tend to stick with regular shapes. I like to start drawing the pattern with a triangle formation.

Then turn the triangle upside down and do it again.

The end result is a flower looking mess of circles.

Cut along the outside edge of the pattern only and put it on your design to see if it's the right size. If not, you can run it through a copier to enlarge or reduce it, or just find another cirlce and make a new pattern.


That's it for the pattern. Easy huh? By the way, is anyone out there? As a special giveaway, anyone who posts a comment to this post will be entered in a drawing to win a Fig and Plum charm pack.


Next week we'll be adding the interfacing onto the fabric and cutting stems :)

Sunday, July 5, 2009

Free Online Class - Applique 3D Flowers, Week 2

Welcome to week 2 of the Applique 3D Flowers online class! I was going to edit the week 1 blog post but decided to link to it instead. The link is in the calendar.

We have a Flickr group all ready to go. The group is public so anyone can post a pic. Anyone who posts class pics each week will get an entry into a drawing to be held at the end of the 6 week class. The prize pack is a free Christi Friesen book and Lila Tueller charm pack.

Applique 3D Flowers

Calendar:
Week 1 - Get Ready, Get Set, Go
Week 2 - Supplies and Design
Week 3 - Making a Pattern
Week 4 - Stems
Week 5 - Flowers
Week 6 - Centers and Leaves

This week: Supplies and Design

Design
Layout your project, fold, and pin your prospective fabric to it. Don't worry about being neat. At this stage we are only getting an idea of the size needed and how the fabrics work together. We will make a pattern, cut, and sew later. Try different fabric combinations and sizes until you are satisfied. It's easier to change your mind now than later. If you are making something from scratch (a journal or hat) it's easier to do the applique first on the cut fabric before sewing the fabric together. Obvious right? Sometimes the obvious isn't so obvious :)

Interfacing
Interfacing is an important choice at this point. I generally use Pellon interfacing because it's readily available and fairly inexpensive. The curtains with the giant flowers were made using double sided heavyweight fusible. The Tshirt I'm designing will be too stiff if I use the same interfacing for the stems and leaves as I used for the curtains , but I want the flowers to be stiff so I will use it there. I like double sided interfacing since it stabilizes the design so nicely (no pins to stick myself with when sewing!). For the stems and leaves on the Tshirt I'll be using Pellon's Wonder Under, a very lightweight non-woven interfacing.

Supplies
The amount of fabric needed depends of what size your applique is. I plan to use a charm pack for my fabric, but as you can see from the design I may need to seam the stem on one of the flowers or use a different stem fabric. There needs to be enough fabric to cover the flowers front and back. Stems and leaves only need enough for the front. Interfacing should be double sided fusible so the fabric can be ironed to it and easily sewn. Heavy interfacing is needed for the flowers (only 1 layer), and interfacing to match your project is needed for the stem and leaves (again only 1 layer). On the curtains I used 1/2 yard for the stems and leaves, and 1 fat quarter for each flower.


What's going to happen when I wash the Tshirt with the flowers on it? I don't know. I guess it's all part of the project :)

Come on and post your project in the comments :) When I post something I find it gives me the added incentive to finish the project.

Sunday, June 28, 2009

Free Online Class - Applique 3D Flowers

Our first online class is about to begin! This one is free and open to everyone!

Here's how it will work. Each week this blog post will be edited with the next class topic. Questions can be posted in the comments and I will answer in the comments. Instruction pics will be posted here, and student pics can be posted to a class Flikr group. A Flikr group slide show will be linked here similar to the Designed by Spool {} slide show in the sidebar.

This is a nice and easy class with plenty of time to complete each weeks project. The postings will be on Monday so we have all week to think and gather supplies, then crank out the project on the weekend. Since this is the first class, any and all suggestions are welcome on how the next class can be improved :)

So let's get going!

Applique 3D Flowers

Calendar:
Week 1 - Get Ready, Get Set, Go
Week 2 - Supplies and Design
Week 3 - Making a Pattern
Week 4 - Stems
Week 5 - Flowers
Week 6 - Centers and Leaves

Recently I posted some curtains with giant 3D flowers appliqued on them. Below is a bit of a closeup again. The largest is about 3 feet tall. Our class project explains how to design your own project using these flowers as the base design. I hope everyone has a great time!

Week 1 - Right Now!
Get Ready, Get Set, Go!
This week we are going to think about what we want our project to be. Most of us have our favorite ways to encourage inspiration. Whatever works for you is just fine. My favorites are thinking while driving (oops, is that dangerous?) and making little (insanely horrible) sketches in my (extremely private) sketchbook.

I'm thinking of decorating a Tshirt using a very small version of the 3D flowers. Another thought I had is a sketchbook (although I just killed a spider with my sketchbook, so I don't know how fancy I'd want to get with something that's going to end up with spider guts on it!). Maybe a cute hat with flowers on the side? Please feel free to use any of these ideas if you get stumped :)

So - think it over, make a couple sketches (I'm sure they'll be better than mine!) and get some ideas. Comment with any questions or err, comments...
Next week we'll talk about supplies, interfacing choices, and design.

See ya then!


Friday, June 26, 2009

June Craft Challenge Voting is Here!

It's time to vote for the June Christy's Craft Challenge! My fishy is there, but my favorite is the Bride Guest Book Doll. Check it out :)

Join us in August for the next Craft Challenge. It's a lot of fun being creative with specific materials to use in your masterpiece :)


Sunday, June 21, 2009

June Craft Challenge is Fishy!

Here's my entry for Christy's June Craft Challenge! A Fish Closet Pommander. Just add herbs inside the tail fin (yes, up his butt) and hang for a sweet smelling closet.

Btw, I was one of the winner's last month (Chisty's pick, awww *blush*). We have a challenge vacation next month, but come join us for August!

This month's packet contained an empty toilet paper roll. Just for the record, the roll is inside the fishy holding the packet of herbs in place :)


Monday, June 15, 2009

Finally!


Finally finished my big programming project and I can get on with the rest of my life!
Here are some curtains I made for Sadie to keep the spookies at bay...


Friday, May 29, 2009

Featured in Turkey!


Spool {} has drawn the attention of an extremely cool website in Turkey called 10marifet.org! I can't read it but the owner has an awesome collection of craft postings from around the world. Check it out!


Sunday, May 24, 2009

Featured on Craft Gossip!

Anne at Craft Gossip is great at finding projects for the Craft Gossip Sewing blog.
Check out all the projects she posts daily!

She's also says the nicest things :) My slippers are on a Lookie this morning!


Saturday, May 23, 2009

Christy's Craft Challenge May

All done with my Craft Challenge entry for May! Click the link to join us next month!
I made these slippers by wrapping paper around my feet, then smoothing out the paper to cut the fabric. They were fun to make but a little too fiddly for a tute. Here are a few pics anyway :)

Watch for classes coming soon. The first class is a freebie!

I love these! I've been wearing them ever since I finished them and they feel great!


Sunday, May 17, 2009

I Don't Have Any Projects to Share...But Check Out My Cool Iron!

Well, I got some sewing in today! Too bad I didn't finish anything...but I'm working on some good stuff :)

In the meantime, I'd like to share my newish iron. It's fabulous and amazing and was only $20 at Target! I love my good deals you know :) So, the name of this most fabulous and thrifty iron is the Black and Decker Steam Xpress. It has a very steamy steam button and gets hot hot hot. Since I use a lot of interfacing it's perfect.

It has other good stuff too, like a no steam switch (who cares - we need steam!) and different settings for different fabrics (if you have to turn the iron down to iron the fabric you probably can't put the fabric in the dryer, so again, who cares!) and an auto shutoff switch set at 30 seconds in case the iron is left lying on it's hot side (well I guess that's good, although I'm really not planning on leaving the iron lying around, since I love my fabric and all...). As I was saying, it gets hot hot hot and has a steamy steam button :)